![]()
Maintenance works must only be undertaken after the temperature of each part has been lowered to less than 50 deg.C.
Place any detached items on a clean sheet or tray. Do not lose or contaminate these items.
Undertake the works using the appropriate tools. Any dirt on the tools being used must be wiped off in advance using gauze etc. dipped in acetone.
Tweezers, Allen wrench (accessory of collector adapter )
1 |
Prepare the FTD2010 collector repair kit (Part No.: 221-49079-91) and the collector adapter (221-70846-91). |
|
2 |
Press the [DET] key to display the FTD screen. Lower the FTD temperature to below 50 deg.C and stop the supply of detector gas. Turn off the FTD power controller. |
|
3 |
|
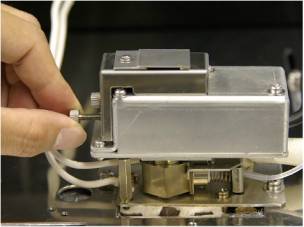
Loosen the 2 collector fixing knurled screws.
|
4 |
|
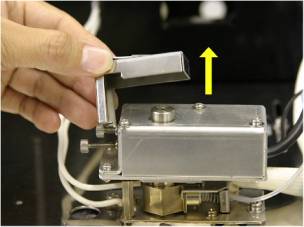
Detach the collector cover.
|
5 |
|
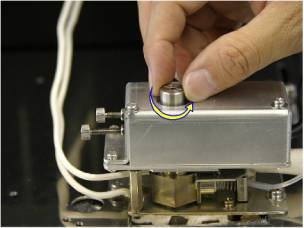
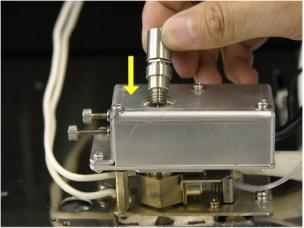
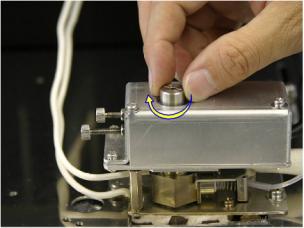
Rotate the FTD collector by hand to loosen it. |
6 |
|
Detach the FTD collector. |
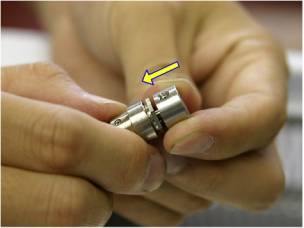
7 |
|
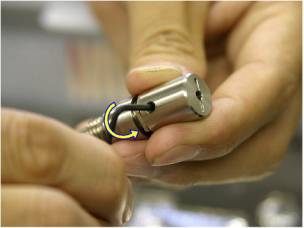
Loosen the collector fixed nut with the Allen wrench (standard accessory of the collector adapter) and detach the knob portion. |
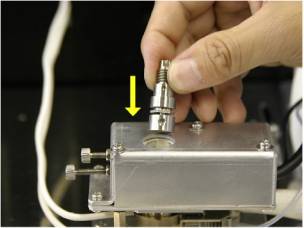
8 |
|
Attach the collector adapter. |
9 |
|
Tighten the fixed nut with the Allen wrench and fix the adapter. |
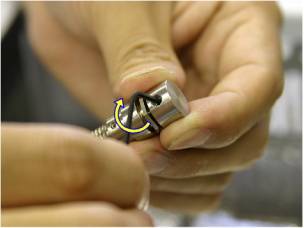
10 |
|
Attach the collector upside down. |
11 |
|
Tighten the collector fixing knurled screws a number of turns, alternating between the top and bottom screws. |
12 |
Press the [DET] key to display the FTD screen, and after setting the control mode to 'Voltage', and the power to '0%', turn on the FTD power controller.
|
|
13 |
|
Increase the power a little by little while checking the glow of the filament of the alkali source. When it becomes a pale orange, use tweezers to bring the rod-shaped, top-up alkali source to lightly touch the coil. Melt it a little by little to add the alkali source onto the coil. Raise the voltage about 5 to 10% if the thermal capacity increases and the coil becomes dark and the top-up alkali source gets stuck on the coil. This will make it glow red again, so take away the excess. Adding too much of the alkali source will result in reduced sensitivity during analysis. Therefore, as a guide, add enough to cover the coil thinly (outer diameter 1.8 to 2mm). |
14 |
Once the alkali has been added, increase the voltage a further 5 to 10% to smooth out the alkali source on the coil. Set the voltage to 0% once the surface is made even, and turn off the power controller. Change the control mode to 'Current'. |
|
15 |
Loosen the collector fixing knurled screws and detach the collector. |
|
16 |
Remove the adapter and put back the knob portion. |
|
17 |
|
Attach the new FTD collector by turning it until it touches. Tightening it too strongly may cause the filament to break, so hand-fix it instead of using a screwdriver. |
18 |
|
Put back the collector cover. |
19 |
Tighten the collector fixing knurled screws a number of turns, alternating between the top and bottom screws. The screws must be tightened several times, as tightening one screw may loosen the other. Check to ensure that it has been fixed properly. If this screw is loose, the alkali source will not glow as hot, possibly resulting in reduced sensitivity. |
|
20 |
In order to let the alkali source settle, and to reduce the contaminants which are a cause of noise, set the current to about 1.00pA and condition the system under the adjustment mode for about 3 to 5 hours, using the same flow rate of hydrogen, air, and make-up gas as the analytical conditions. |
|
Maintenance Top ; GC-2010 Main ; GC-2010 Detector ; GC-2010 Sample Injection Port ; GC-2010 Column Oven